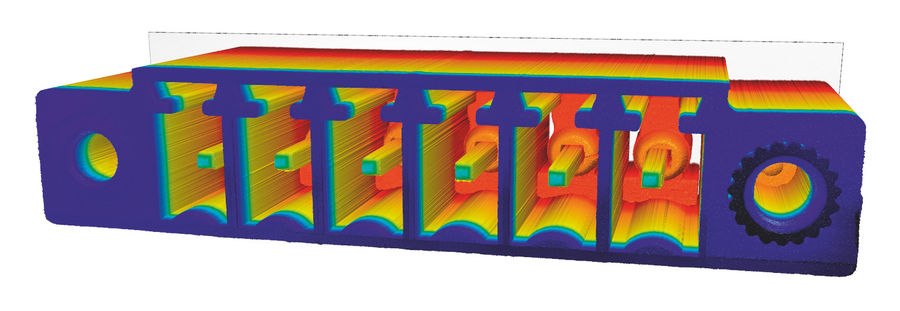
3D inspection every second
High-resolution optical measuring equipment is increasingly used for demanding inspection tasks, such as 100 percent inline testing of electrical plug-in connections. In particular, the white light interferometers, which until then were only known from the laboratory sector, are used directly in production lines.
According to the manufacturer, a new industrial white light interferometer (WLI) from Heliotis, Lucerne/Switzerland, combines accuracy and speed in a robust 3D sensor and is characterized by universal applications. The industrial WLI is based on the most accurate optical measurement method – interferometry – and an ultra-fast CMOS image sensor with integrated signal processing, an in-house development of the manufacturer.
Typical test tasks include the measurement of electrical plug-in connections. The XY position of the individual pin tips (tumult test), their Z-position (settling depth) as well as the dimensional accuracy as a whole must be checked. These tasks are basically all of the same character, i.e. the position must be measured and evaluated in all three dimensions (XYZ) relative to the references.
What are the challenges of testing connectors
Behind this supposedly simple task lie numerous practical challenges. For example, the reflective pin tips present many optical measuring instruments with insurmountable problems, as their dynamic range is usually insufficient. Furthermore, all measurement methods based on triangulation produce significant shading, whereby deep cavities can only be partially detected. The mechanical vibrations present in the production line also make it difficult to use highly sensitive sensors. In addition, the increasingly narrower tolerances significantly restrict the choice of the measuring device.
What influence the tolerances have on the choice of measuring device
Various national and international standards require proof of suitability when selecting the appropriate measuring device. This evidence must be provided using statistical methods. This does not mean the widespread golden rule of measurement technology, according to which the uncertainty of a measuring instrument should not exceed one tenth of the tolerance. This is long outdated, according to the manufacturer.
Today, a measuring agent is considered capable if the ratio between a percentage of tolerance and the dispersion caused by the measuring agent meets a previously specified value. The calculation procedure is determined differently depending on the company. For example, according to the Bosch method, 20 percent of the tolerance (T) is calculated in relation to the six-fold standard deviation (see Cg ). The standard deviation is determined from at least 25 repeat measurements. Measuring equipment with a Cg value of 1.33.

By reshaping the above formula, the permissible standard deviation can thus be calculated by specifying the tolerance, which serves as the basis for the feasibility test for the measuring technician (cf. ):

According to the Bosch method, the permissible standard deviation at a tolerance of 0.2 mm would be 0.005 mm or by a factor of 40 (!) smaller. Conventional measuring means do not achieve this precision in practice (contrary to data sheet data), explains the manufacturer. For interferometric measuring means, however, such accuracy is not a problem.
According to the manufacturer, the Industrial WLI overcomes all practical hurdles in the inspection of electrical connectors. Thanks to high measurement dynamics, it masters even the strongest reflections. Since the measurement is perked to the surface, according to the company, no covers/shading occur. The vertical resolution in narrow and deep cavities is also fully maintained. By integrating the image sensor and signal processing into a CMOS chip, extremely high frame rates can be achieved and even vibrating surfaces can still be detected interferometrically accurately, explains the manufacturer.
With the transfer of this laboratory measurement technology to the production line, only qualitatively solvable tests can be replaced by quantitative testing processes. This has the advantage that the measurement data can be transferred directly to the control/control process.
The Industrial WLI offers low-maintenance, easy integration into production and testing facilities. The included interfaces for application programming such as C++, Halcon, LabView and Phyton allow a connection to existing image processing solutions.
Theo Bruelhart


